How do FIDO BIOMETRICS Work on a Device?
When you use FIDO registration you are using a Public/Private key pair, but for the device, and only for a single service and user account.
WebAuthn let users authenticate with two types of authenticators:
-
Roaming authenticators are removable and cross-platform, like a Yubikey, and can be used on multiple devices. To authenticate with a roaming authenticator, you need to connect it to the device (through USB, NFC, or Bluetooth), provide proof of presence (by touching it, for example), and optionally provide user verification, for example, by entering a PIN.
-
Platform authenticators are attached to a device and only work on that device. Some examples are MacBook’s TouchBar, Windows Hello, iOS Touch/FaceId, and Android’s fingerprint/face recognition. Biometric data is stored on the device and never sent to the server. When biometrics cannot be used, alternative authentication methods are usually provided. For example, if you are wearing a mask, instead of using Face ID you can enter your passcode.
ANDROID FLOW
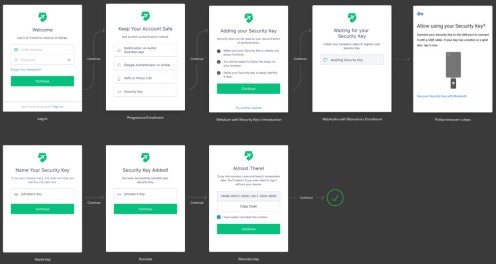
The default enrollment flow for security keys in Android displayed below and has the following steps:
-
Users authenticate with username/password.
-
They are prompted to select the authentication method they want to enroll.
-
If they pick Security Keys, they are shown a list of instructions.
-
They are then prompted to enter their security key.
-
The device shows their native UI to complete the security key challenge.
-
Users can name the key to later identify it, in case they enroll multiple ones.
REGISTRATION FLOW
Step 1 – User is prompted to choose a FIDO authenticator. This may appear as a SELECT A METHOD (Email, SNS, Yubikey).
Step 2 – User unlocks the FIDO authentication using a finger print reader, a button, a PIN or other method.
Step 3 – The DEVICE creates a NEW public/private key pair, which is UNIQUE for the DEVICE, the online service and the USER’s Account.
This unique key pair, prevents the keys being shared and reused elsewhere, as the key relates to one browser domain eg Lloyds Bank or Halifax.
Step 4 – The Public key is sent to the online service, and associated with the User’s account. (Public key linked to User account).
Step 5 – The Private key and BIOMETRICS of the user (for local authentication) NEVER LEAVE THE DEVICE.
Summary
FIDO protocols use standard PUBLIC Key Cryptography.
Authentication is carried out by the device using the PRIVATE key to SIGN a challenge from the Service.
The PRIVATE keys can only be used, after they are unlocked locally on the device by the user.
This LOCAL UNLOCK is an action such as a fingerprint reader, a PIN, voice print from a Microphone or a 2nd factor device (Yubi Key) or pressing a button.
FIDO Protocols do not provide information that can be used by different online services, to track users.
FIDO2 – Passwordless
Fido2 is about removing the username/password, and replacing it with Biometrics.
Instead of a password, users confirm their identity, using biometrics or a pin on a device.
Strong first factor means passwordless.
Enforce Attestation setting (disables self signed certificates)
If you enable this setting, it will require that keys which you are using have a trusted certificate, therefore you will disable security keys which have a self-signed certificate from being used. Enforcing attestation therefore means that during the enrollment process the certificate is checked to confirm if its legitimate and therefore brings in more secure security keys.
Always give the user the option of several methods to select from. Users often lose their phone, can’t use the selected biometrics, or lose access to the email, so have several back up plans ready.

