
Recently I was asked to discuss what is a “default device” in P1SSO MFA, so I took a deeper dive, and found some interesting results.
The First device registered for a user is considered the “default device”.
However, that doesn’t mean that device will be used by P1SSO. So what is P1SSO doing under the hood, in order to select the default device?
- First, an ordered list of devices is compiled for that user, (eg SMS OTP, Email OTP, Mobile Push OTP).
- A venn diagram of devices (methods) for both the authn policy and the mfa policy are compared. What are the common methods allowed (methods such as SMS, Email and Mobile) for both the authn policy and the MFA policy. For this instance we go with SMS OTP, as this is allowed by both policies.
- Next, PingOne looks for “Blocked devices” and removes them from the ordered list, and reorders the list of devices for the user.
- Lastly it checks to see if MFA is to be sent direct to a device, or a list of all devices is presented to the user. The OTP won’t be sent, until the user selects SMS.
This means, that even where SMS is selected as the default device, the OTP might be sent via email. Why?
SMS is listed as “blocked or locked”
If the SMS device is blocked, the SMS device will be removed from the ordered list of devices for the user, and the list reordered to REMOVE SMS.
P1SSO MFA knows it can’t use SMS to send an MFA, so it has to find a different way. What’s next?
If Email OTP is unblocked, it might choose Email. The user would have the OTP via Email.
Reference:
Azure AD doesn’t work the same way as legacy Active Directory. Many attributes that are expected, such as employeeid, are not released by default.
In Azure the employeeid attribute can be obtained using the Graph and custom attributes, or via powershell.
Here’s an excellent video which explains how to release employeeid in Azure
Check the token in jwt.io or jwt.ms, to ensure it contains your custom attribute.
Any attributes that are null, will never appear in a token.
This video covers setting up a test Azure OIDC Sample App for testing.
This next video shows the difference between an Access Token and the ID Token.
Access Token = claims related to the App
ID Token = identity of the user
When FIDO creates a Public/Private key pair for a device, a user and a service (its a 3 way authentication), the Public key is sent to the service. How does the device know how to do this?
Step 1 – Metadata Service
FIDO operates a Metadata Service.
The FIDO Vendor supplies Metadata, as part of FIDO certification. This metadata is held on the Metadata Service, which is pulled in by a FIDO Server on a regular basis.

The DEVICE sends a PUBLIC key to the FIDO server, which uses the pulled in metadata to validate the Crypto key, with information provided by the VENDOR when the device was registered with FIDO.

So what is happening next?
The FIDO server downloads the Metadata from an official URL.
The FIDO server uses a digital signature to ensure the metadata has not been tampered.
The metadata cites all the authenticators known to FIDO (checks the Integrity and Authenticity of the metadata).
Step 2 – The Metadata carries revoked and security breach information, along with a Rogue List.
Revoked

Malware can bypass security

Rogue List

Reference:
FIDO Metadata URL
https://fidoalliance.org/specs/mds/fido-metadata-service-v3.0-ps-20210518.html
Biometrics URL
When you use FIDO registration you are using a Public/Private key pair, but for the device, and only for a single service and user account.
WebAuthn let users authenticate with two types of authenticators:
-
Roaming authenticators are removable and cross-platform, like a Yubikey, and can be used on multiple devices. To authenticate with a roaming authenticator, you need to connect it to the device (through USB, NFC, or Bluetooth), provide proof of presence (by touching it, for example), and optionally provide user verification, for example, by entering a PIN.
-
Platform authenticators are attached to a device and only work on that device. Some examples are MacBook’s TouchBar, Windows Hello, iOS Touch/FaceId, and Android’s fingerprint/face recognition. Biometric data is stored on the device and never sent to the server. When biometrics cannot be used, alternative authentication methods are usually provided. For example, if you are wearing a mask, instead of using Face ID you can enter your passcode.
ANDROID FLOW
The default enrollment flow for security keys in Android displayed below and has the following steps:
-
Users authenticate with username/password.
-
They are prompted to select the authentication method they want to enroll.
-
If they pick Security Keys, they are shown a list of instructions.
-
They are then prompted to enter their security key.
-
The device shows their native UI to complete the security key challenge.
-
Users can name the key to later identify it, in case they enroll multiple ones.

REGISTRATION FLOW
Step 1 – User is prompted to choose a FIDO authenticator. This may appear as a SELECT A METHOD (Email, SNS, Yubikey).
Step 2 – User unlocks the FIDO authentication using a finger print reader, a button, a PIN or other method.
Step 3 – The DEVICE creates a NEW public/private key pair, which is UNIQUE for the DEVICE, the online service and the USER’s Account.
This unique key pair, prevents the keys being shared and reused elsewhere, as the key relates to one browser domain eg Lloyds Bank or Halifax.
Step 4 – The Public key is sent to the online service, and associated with the User’s account. (Public key linked to User account).
Step 5 – The Private key and BIOMETRICS of the user (for local authentication) NEVER LEAVE THE DEVICE.
Summary
FIDO protocols use standard PUBLIC Key Cryptography.
Authentication is carried out by the device using the PRIVATE key to SIGN a challenge from the Service.
The PRIVATE keys can only be used, after they are unlocked locally on the device by the user.
This LOCAL UNLOCK is an action such as a fingerprint reader, a PIN, voice print from a Microphone or a 2nd factor device (Yubi Key) or pressing a button.
FIDO Protocols do not provide information that can be used by different online services, to track users.
FIDO2 – Passwordless
Fido2 is about removing the username/password, and replacing it with Biometrics.
Instead of a password, users confirm their identity, using biometrics or a pin on a device.
Strong first factor means passwordless.
Enforce Attestation setting (disables self signed certificates)
If you enable this setting, it will require that keys which you are using have a trusted certificate, therefore you will disable security keys which have a self-signed certificate from being used. Enforcing attestation therefore means that during the enrollment process the certificate is checked to confirm if its legitimate and therefore brings in more secure security keys.
Always give the user the option of several methods to select from. Users often lose their phone, can’t use the selected biometrics, or lose access to the email, so have several back up plans ready.
PingAccess works similiar to a firewall, it rewrites URL’s and protects the PingFederate server.
Certs > Site > Virtual Host > PA App > Token Provider
Step 1 – Exchange Certificates
Step 1.1 – Export the PingFederate certificate for the PF Engine.
Security> SSL Server Cert
Select Action > Export
Certificate Only > Export
Save the cert where’s its easy to find.
Step 1.1 – Import the PF Cert into PingAccess
Start from PA Admin Console
Security > Certificates > + to import
Name it eg PF
Choose file > select the PF engine cert > Add
Drag the imported cert from the Cert pane to the Trusted Cert Group pane.
Step 2 – Create a PingAccess SITE
PA Admin Console
Sites > + add site
name = PF
Target = https://loadbalancer:443 or https://host:443
Secure = yes
Trusted Cert Group = PF
Save
Step 3 – Create a PA Virtual Host
The Virtual Host is how PingAccess will access the PF engines.
PA Admin Console
Access > virtual host
Add Virtual host
Host = https://pingfederate_host
Port = 443
Agent cache = 900
Save
Step 5 – Create Key Pair for PF host
Security > Key Pairs
Add Key pair
Alias PF Master
Common Name = https://pingfederate_host
Subject Alternative Name = https://pingfederate_host
Step 5.1 – Import key pair to the virtual host
PA Admin Console
Networking > Listeners
Engine key pairs pane > change PF Master to the base URL of Ping Access virtual host > Save
Step 6 – Match PingAccess Token Provider to PingAccess App
PA Admin Console
System > Token Provider
Host = https://pingfederate_host
Port = 443
Audit = yes
Save
Step 7 – Update PF base URL
PF Admin Console (not PA)
System > Protocol Settings > Federation Info
Change BASE URL to the base URL nad port of the PA VIRTUAL HOST > Save
CAUTION: If you get the wrong base URL, PF will be corrupted and you can’t access it.
Double check the base URL.
Step 8 – Verify Access from PA to PF
Browser
https://virtualhost:port/pf/heartbeat.ping
You should get a response from PF
Browser
https://virtualhost:port/pa/heartbeat.ping
You should get a response from PA
In Pingfederate 11, the heartbeat can be set to report back live stats about the server. The Admin console is configured separately from each engine.
The heartbeat URL for the Admin console is:
https://localhost:9999/pf/heartbeat.ping
The important question that you’re asking me now, is how do we configure the Admin console heartbeat, and the Engine heartbeat? Here we go.
Step 1 – run.properties
The default location for run.properties is:
pfinstall > pingfederate > bin > run.properties
Use Notepad++ to open run.properties file > search for heartbeat

By default the heartbeat is set to false, we need to edit this to say true.

Edit heartbeat = true

Step 2 – restart services

Step 3 – heartbeat url
The syntax for the heartbeat url is https:// host : port /pf / heartbeat.ping
Note its pf, not Pingfederate.
An example for the Admin Console (on port 9999) would be
https://localhost:9999/pf/heartbeat.ping
This is repeated next on the engines, for a cluster.

Step 4 – Templates for the Admin Console.
Pingfederate uses templates for the heartbeat. There are two templates one for the Admin Console and another for Engines. They are both in a default location.
Default Location = pf install > pingfederate > server > default > conf > template
Files = heartbeat.admin.page. template and heart.page.template

Admin Template = heartbeat.admin.page.template

The good news is that template updates do NOT require a server restart.
Step 5 – Engine Template = heartbeat.page.template

Caution:
Ensure the servers are behind a load balancer, or your server statistics will be publically available.
Step 6 – Percentiles (didn’t really see the benefit of this).
You may wish to edit the templates to have percentiles reported.
Default Location = pf install > pingfederate > server > default > data > config-store
File = com.pingidentity.com.monitoring.MonitoringService

Default = 90

Edit Default = 99.9

Template edits do not need a server restart.
OAuth2 has 4 grant types. Each grant has a different sequence of steps. Clearly each grant is designed for a different situation.
This is why Oauth flows confuse people. The steps and sequence will be different for each flow.
Visual Guide to Flows
The diagram below is the best visual guide to OAuth, that I’ve come across in several years.
The client, makes an authorisation request (via a browser).
The /authorization end point of the OAuth server, deals with the user login and consent.
Next, the /authorization endpoint sends a code out, to the /callback endpoint of the client.
The /callback is detailed in the redirect_uri parameter.
An example would be:
GET /callback?code=a1b2c3d4e5f6g7h8&state=ae13d489bd00e3c24 HTTP/1.1 Host: client-app.com
Now communication via the browser stops – and the sequence continues in secret, as server to server communication

The Client has a CODE… but the code needs to be exchanged for a TOKEN.
This is what happens in the exchange of CODE for a TOKEN (called an ACCESS TOKEN REQUEST) – Step 4.
It makes a POST call to the /token endpoint, to make the exchange.
An example would be:
POST /token HTTP/1.1 Host: oauth-authorization-server.com … client_id=12345&client_secret=SECRET&redirect_uri=https://client-app.com/callback&grant_type=authorization_code&code=a1b2c3d4e5f6g7h8
The /token endpoint of the OAuth server sends token request back to the client – called an ACCESS TOKEN GRANT – Step 5.
An example would be:
{ “access_token”: “z0y9x8w7v6u5”, “token_type”: “Bearer”, “expires_in”: 3600, “scope”: “openid profile”, … }
The Access token grant is FROM to the /token endpoint of the Oauth Server to the client.
Now all transactions moves to a different endpoint.
An API call is made by the client, to the /userinfo endpont of the OAuth server. The Access Token is sent to the /userinfo endpoint, as evidence, it is allowed access.
An example would be:
GET /userinfo HTTP/1.1 Host: oauth-resource-server.com Authorization: Bearer z0y9x8w7v6u5
The final step is that user data is returned from /userinfo endpoint, of the OAuth server to the Client, so that the user can be logged in.
- Code Flow
The code flow is the most secure.
Used where the client can keep secrets.
Code is between the Auth Server and the Resource Server.

2. Implicit Flow
Immediate Token is sent. No code is sent. Gives immediate access. Used where a client cannot keep a secret, so no point in sending a code, eg a mobile.
PUBLIC CLIENT, as in mobile or web browser.

3. Resource Owner
You enter your facebook password into the facebook app on your phone.
You trust the mobile app with your password, as they own the app, a breach isn’t in their interests.
4. Client Credentials
Used for the client to access its own resources, or information about itself.
Reference:
In the oauth protocol, the id_token proves successful authentication by the IDP occurred.
When the scope lists openid, oauth will return an id_token.
- The id_token is in a fixed format.
- The token is in JWT.
- Claims are included, if profile and email are in the scopes requested.
How to decode the token?
On the wire, the token is encoded.
Visit jwt.io to automatically decode the token (just paste in the encoded text).

Header:
This will usually state type:jwt, alg:rs256,kid=key id
Payload:
The payload contains the user claims and includes several critical fields for troubleshooting, if the authentication has issues.
- Iss = issuer
- aud= audience ie the app that is to receive the token
- iat = issued at time
- exp = expiry time
Check the iat and expiry time for clock skew at the IDP, particularly, if the IDP’s clocks are ahead of the SP.
Bearer Token
The bearer token, is the equivalent of cash.
Possession of the bearer token is all you need, to get what you want, and cash has no identity linked to it.
The other system is called Proof of possession; however this is not widely used, but acts like a visa card, with an identity linked to it.
In Oauth, the Implict flow makes reference to the at_hash. So lets consider this parameter in more detail.
Step 1 – take the access token (we’ll call it x).
Step 2 – hash the access token with SHA-256 (we’ll call it Y).
Step 3 – take the left hand side of the hashed token Y1 (which is only 128 bits).
Step 4 – Base64 encode the left hand side of Y1 (we’ll call it Z).
Step 5 – Z is the at_hash, ie the hash of the access token, after its been hashed with SHA-256, only the first left hand halve of the hash taken, and that half is encoded with Base64 to form the at_hash.

The Implict flow spec states that the client MUST validate the SIGNATURE of the ID Token.
Both education and healthcare sectors are being targeted by PYSA ransomware. These targets are specially chosen as they hold Personal Data, and use the Windows Operating System
How?
The means of access is Pysa and ChaChi Remote Access Trojan.
Pysa ransonmware
RAT
https://blogs.blackberry.com/en/2021/06/pysa-loves-chachi-a-new-golang-rat
What?
What happens next, once they’ve breached a target site?
Key highlights of the PYSA campaign include:
- Defense Evasion: PowerShell scripts to uninstall/stop/disable antivirus and other essential services.
- Credential Access: Dumping credentials from LSASS without Mimikatz (comsvcs.dll).
- Discovery: Internal network enumeration using Advanced Port Scanner.
- Persistence: ChaChi installed as a Service.
- Lateral Movement: RDP and PsExec.
- Exfiltration: Likely over ChaChi tunnel (not observed).
- Command and Control (C2): ChaChi RAT.
How do they achieve persistence?
Persistence
Shortly after its initial execution ChaChi decodes a service name and service description:
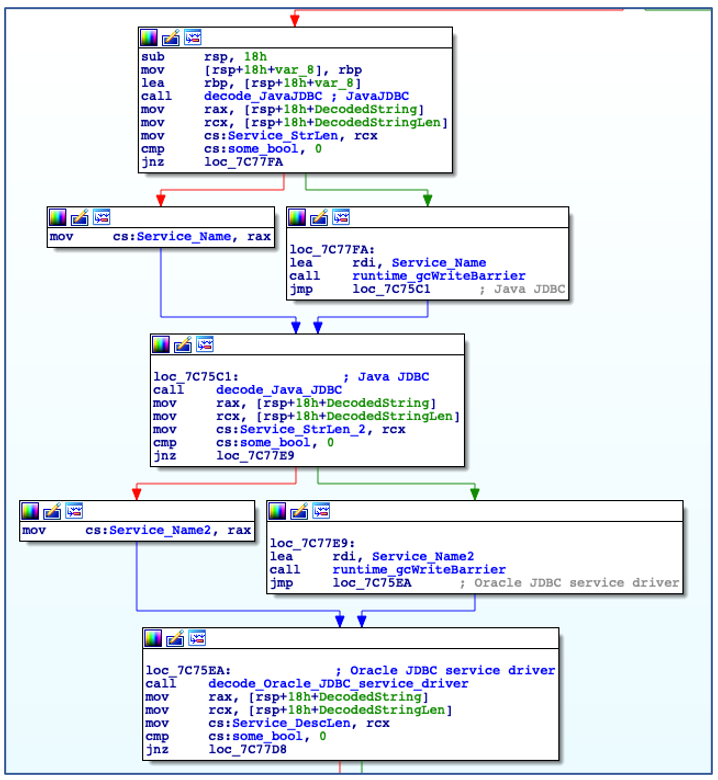
Decode Service Name and Description.
Using the decoded service name, ChaChi enumerates all installed services to check if a service with the same name already exists. In this case, it is named “JavaJDBC”. If a service with the specified name is found, then ChaChi will randomly select another service name from a hardcoded, albeit gobfuscated, list of service name strings:
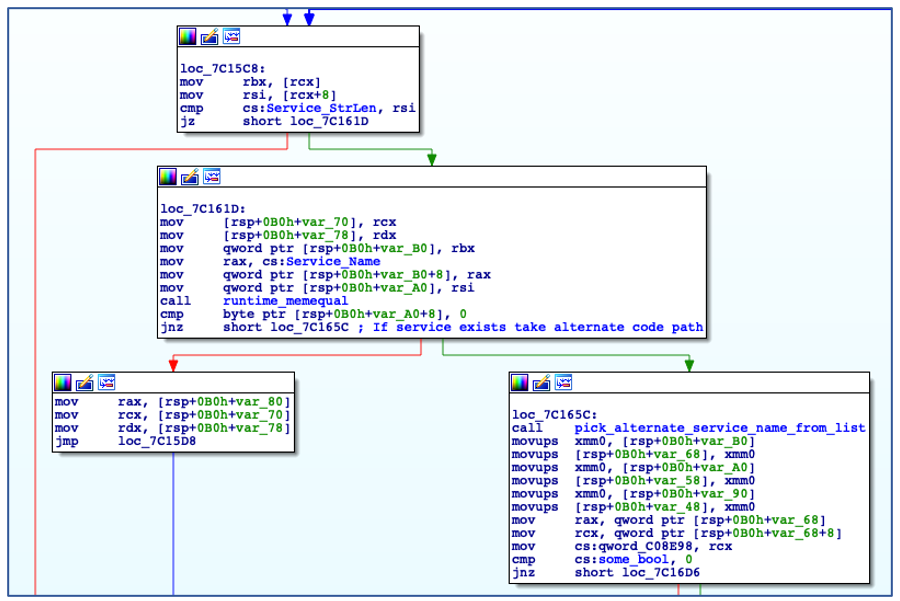
Check if Service Name Exists.
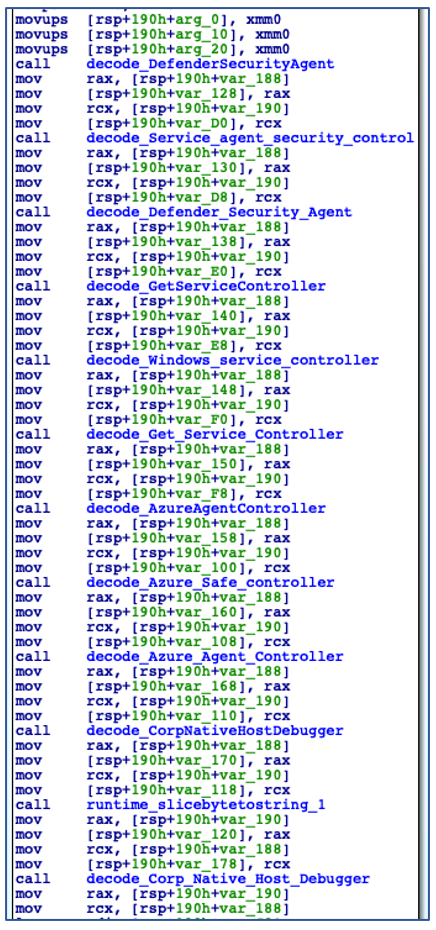
Decoding Alternate Service Names.
After determining an appropriate name to use for service installation, ChaChi then checks to see if it has sufficient administrator privileges to carry out the service creation operation:
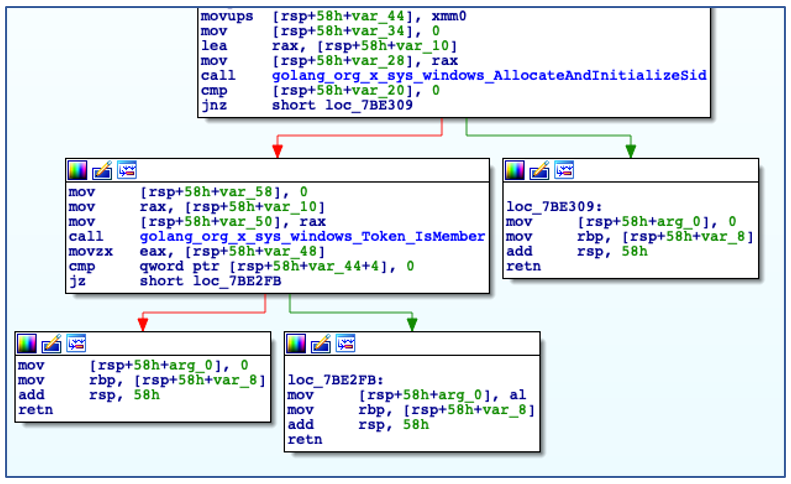
Checking if running with Administrative Privileges.
If ChaChi is not running with administrative privileges, it bypasses its persistence code and begins to initialize command-and-control (C2) communications. If the backdoor is running with administrative privileges, it will install itself as a new service that is configured to auto-start, before manually starting the service:
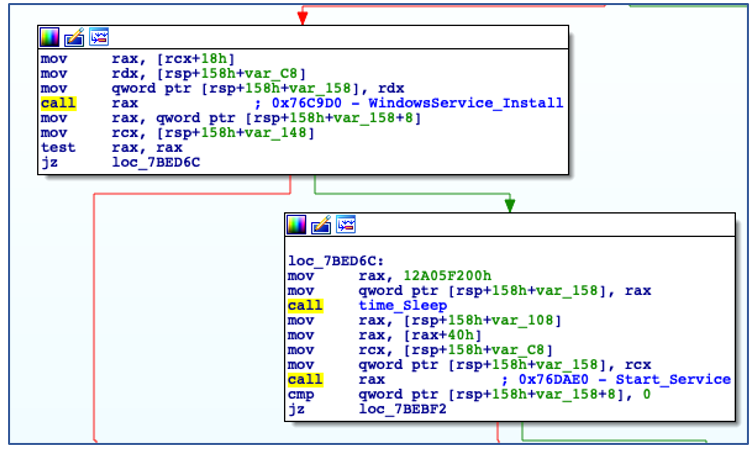
Install as Service and Start the Service.
C2 Communications
ChaChi utilizes two protocols for C2 communications: DNS and HTTP. The primary, preferred method of C2 communication is DNS tunnelling using TXT queries.
TXT or “text” records were originally intended to allow domain admins to associate arbitrary text with a domain, such as domain ownership information or network and server information. Threat actors have taken advantage of this for their own nefarious needs by encoding data in these TXT queries, which is a form of DNS tunnelling.
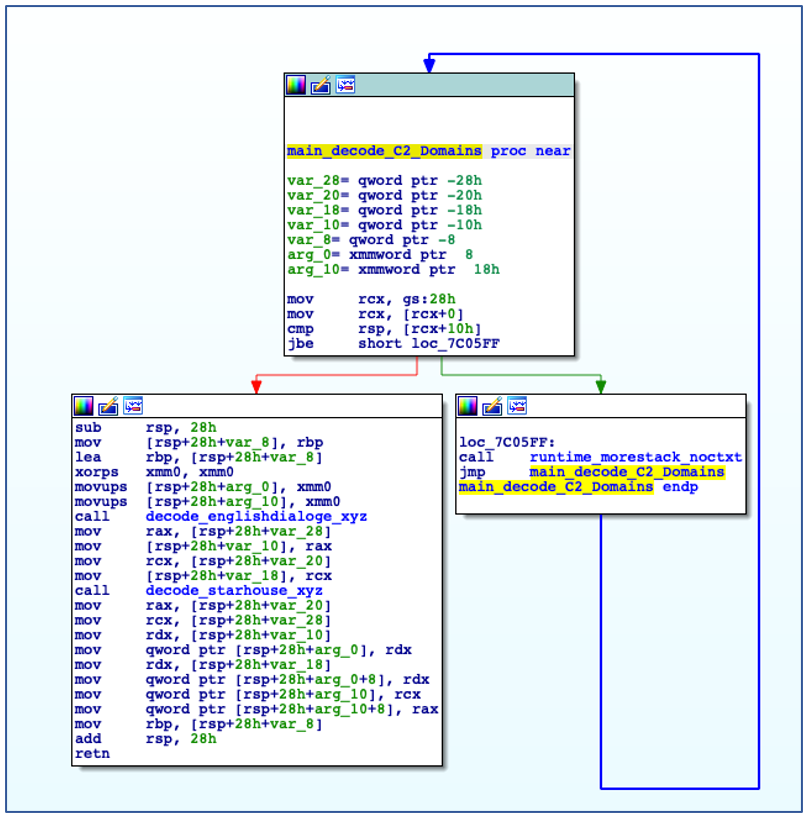
Decoding C2 IPs and Domains
ChaChi is preconfigured with a list of C2 domains for DNS tunnelling, as well as IP addresses for HTTP C2 failover. The domains are encoded just like any other string in a gobfuscated binary, using a dedicated function that carries out the XOR decode process:
C2 Domains are Decoded from Gobfuscated functions.
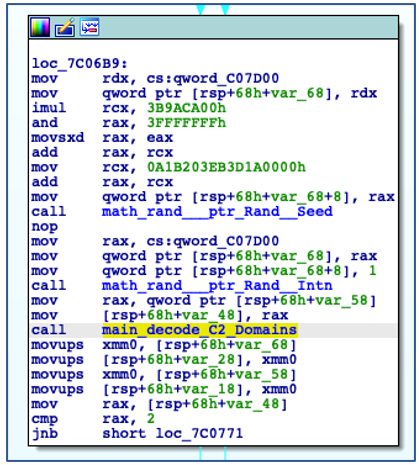
The domain that will be used is chosen at random through the use of “Intn” from the “rand” package, which is seeded by the value returned from an earlier call to “time.Now”:
Randomizing C2 Domain Selection.
The decoding of the C2 IP addresses is a little more complicated, although not overly so. As with the C2 domains, the inevitable selection of a C2 IP address is also randomized through calls to “time.Now”, “rand.Seed” and “rand.Shuffle”. The C2 IP decoding function takes several arguments: a pointer to the encoded C2 IP array, an integer value indicating the number of encoded IP addresses, and a hex number used in the decoding of each octet of each IP address. The decoding of the C2 IP addresses works as follows:
- Read a word (2 bytes) at the initial offset into the C2 IP array determined by the earlier shuffle.
- Subtract the hex number (0xA in all observed cases) from the retrieved value.
- Convert the result to its base 10 equivalent (thereby creating a single octet of an IP).
- Repeat 4 times per encoded IP.
- Join the decoded octets with a “.” (thus fully decoding a stored C2 IP address).
These steps are repeated until all IP addresses have been decoded
C2 Communications Failover.
This failover method is not ideal for the ChaChi operators. It does not offer the encryption afforded to the DNS tunnelling, and it is nowhere near as covert.
The HTTP C2 communications are performed using POST requests to one of the randomly selected C2 IPs decoded earlier. The content of the HTTP POST is encoded using Base64 and XOR encoding to offer some level of data protection, in the same way as the data was encoded prior to being serialized into the “ChunkData” messages in the case of DNS tunnelling.
Should the C2 check-in fail, it will rotate through the other decoded C2 IPs in an attempt to create a connection. If a connection is established, ChaChi will encode and send POST requests to the C2 and process its responses:
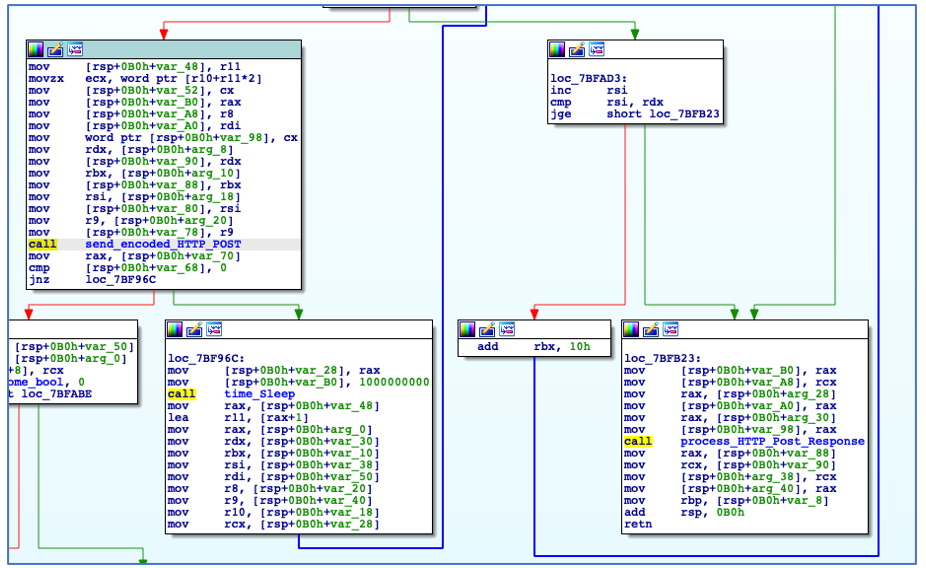
HTTP POST Request and Response Processing.
Decrypting C2 Traffic
As the use of HTTP for C2 communications is less complicated and involves less steps when compared to DNS tunnelling, this section will focus on decryption of DNS traffic.
Decryption of both HTTP and DNS C2 traffic is possible because, once we obtain both the XOR and encryption keys, we can reverse the process that has taken plaintext data and converted it to an encrypted form. Each phase in the encoding and encryption process is reversible:

Encoding and Encryption Process to generate TXT Query.
To do this, we perform the following steps:
- Retrieve DNS TXT queries from packet captures or DNS logs.
- Strip the domain name and “.” separators.
- Decode the string from hex back to bytes.
- Run the decoded content along with the recovered encryption key through a XSalsa20+Poly1305 decryption process.
- De-serialize the decrypted data in order to access the packet field of the “ChunkData” messages – other message types are fully decrypted at this point.
- Apply XOR decoding using the recovered XOR key to the packet field of each “ChunkData” message.
- Base64-decode the result of the XOR operation.
The result of the above process yields decrypted and de-serialized protocol buffers as well as the original data that was encoded and packed into “ChunkData” packets.
Yara Rule
The following Yara rule was authored by the BlackBerry Threat Research Team to catch the threat described in this document:
| rule Mal_Backdoor_ChaChi_RAT { meta: description = “ChaChi RAT used in PYSA Ransomware Campaigns” author = “BlackBerry Threat Research & Intelligence” strings: // “Go build ID:” $go = { 47 6F 20 62 75 69 6C 64 20 49 44 3A } // dnsStream $dnsStream = { 64 6E 73 53 74 72 65 61 6D } // SOCKS5 $socks5 = { 53 4F 43 4B 53 35 } // chisel $chisel = { 63 68 69 73 65 6C } condition: // MZ signature at offset 0 uint16(0) == 0x5A4D and // PE signature at offset stored in MZ header at 0x3C uint32(uint32(0x3C)) == 0x00004550 and // ChaChi Strings all of them } |
Reference:
https://blogs.blackberry.com/en/2021/06/pysa-loves-chachi-a-new-golang-rat
